The Complete NeoVim Configuration Guide for Developers - Part 2

Before starting, I recommend reviewing the first part, where I demonstrated how to set up Neovim from scratch, starting with installation and configuring the console, and finishing with a range of essential plugins for coding:

The material below is best read after going through and following the steps described in the first part. However, if you already have a configured setup and need to add any of the plugins described here, you’ll be able to do so without any issues: I’ve made an effort to describe each plugin independently in separate sections.
Before starting with the editor configuration, I suggest we fine-tune our console—WezTerm, which we set up and configured in the first part.
I’m demonstrating the setup for both the editor and console on Mac, so the following console adjustments are intended for macOS users. If you’re on Linux, you likely won’t encounter the console issues addressed below, and you can go straight to plugin configuration.
Mapping the Command key for use with WezTerm and Neovim
While working, I realized that mapping various combinations to the Command key is much more convenient for me. For example, by default in Vim/Neovim, you need to press Control + w to move to an adjacent window, which, to put it mildly, isn’t very comfortable. It’s much more convenient to remap all Control combinations to Command. Setting up combinations in Neovim is easy; this is typically done with the command:
vim.api.nvim_set_keymap(mode, combination, command, options...)The peculiarity of WezTerm, like most other macOS consoles, is that they don’t transmit combinations to the editor in a readable format (if you know an easier way to do this, feel free to comment). The method I use works like this: we bind all the necessary combinations as UTF-8 characters in the WezTerm config, which will be sent to Neovim. Then, in the Neovim config, we bind these combinations to the transmitted UTF-8 characters.
Configuration in WezTerm:
--- cmd+keys that we want to send to neovim.
local super_vim_keys_map = {
    -- Command + s: saving file
	s = utf8.char(0xAA),
    -- Command + e: scroll downwords (ctrl + e analog)
	e = utf8.char(0xAB),
    -- Command + y: scroll upwords (ctrl + y analog)
	y = utf8.char(0xAC),
    -- Command + h: go to prev tab
	h = utf8.char(0xAD),
    -- Command + l: go to next tab
	l = utf8.char(0xAE),
    -- Command + w: close current tab
	w = utf8.char(0xAF),
    -- Command + t: find file toogle (NvimTree)
	t = utf8.char(0xA1),
}

local function bind_super_key_to_vim(key)
	return {
		key = key,
		mods = 'CMD',
		action = wezterm.action_callback(function(win, pane)
			local char = super_vim_keys_map[key]
			if char and is_vim(pane) then
				-- pass the keys through to vim/nvim
				win:perform_action({
					SendKey = { key = char, mods = nil },
				}, pane)
			else
				win:perform_action({
					SendKey = {
						key = key,
						mods = 'CMD'
					}
				}, pane)
			end
		end)
	}
end

local keys = {
    ...,

    bind_super_key_to_vim('s'),
    bind_super_key_to_vim('h'),
    bind_super_key_to_vim('l'),
    bind_super_key_to_vim('w'),
    bind_super_key_to_vim('e'),
    bind_super_key_to_vim('y'),
    bind_super_key_to_vim('t'),
    bind_super_key_to_vim('['),
    bind_super_key_to_vim(']'),
    bind_super_key_to_vim('n'),
    bind_super_key_to_vim('m')
}

config.keys = keys

return config
The full configuration code can be found here.
Then we map these UTF-8 symbols on the Neovim side. Create a Lua file where we’ll define all the mappings—combinations.lua:
local keymap = vim.api.nvim_set_keymap
local default_opts = {noremap = true, silent = true}

-- cmd+s: save file
keymap("n", "<Char-0xAA>", "<cmd>write<cr>", default_opts)
-- cmd+e: scroll downwords
keymap("n", "<Char-0xAB>", "<C-e>", default_opts)
-- cmd+e: scroll upwords
keymap("n", "<Char-0xAC>", "<C-y>", default_opts)
-- cmd+h: next tab
keymap("n", "<Char-0xAD>", "<cmd>BufferPrevious<cr>", default_opts)
-- cmd+l: last tab
keymap("n", "<Char-0xAE>", "<cmd>BufferNext<cr>", default_opts)
-- cmd+w: close current tab
keymap("n", "<Char-0xAF>", "<cmd>BufferClose<cr>", default_opts)
-- cmd+t: find file toogle
keymap("n", "<Char-0xA1>", "<cmd>NvimTreeFindFile<cr>", default_opts)

-- cmd+1: open left bar
keymap('n', '<Char-0xA4>', '<cmd>NvimTreeToggle<cr>', default_opts)
Now, include this file in the require section of init.lua:
...
require"combinations"
Now, restart Neovim and check: if you open any file and press Command + t, Neovim will automatically navigate you to that file in the file tree.
Now, if you go back to the file and press Command + e, Neovim will start scrolling down; Command + y will scroll up. Command + s will save the file, and Command + h / Command + l will navigate between tabs within Neovim. Now we can move on to plugin configuration.
Telescope - search by files and content
The first plugin I use constantly is Telescope. Currently, it’s the most popular plugin for searching files and content. I’ve been using it for a couple of years now, and I can say that in most cases, the plugin performs its tasks excellently.
For searching within file content, the plugin uses the FZF command-line search utility. Before moving on to plugins, we need to install it:
brew install fzfAnd after installation, load it into the current terminal session:
source <(fzf --zsh)Then, in the same session, open Neovim and create the file telescope_config.lua:
-- Use vim.keymap.set instead of vim.api.nvim_set_keymap
local keymap = vim.keymap.set

-- Map <leader>f to fzf-lua's file search
keymap("n", "<leader>f", require("fzf-lua").files, { desc = "Fzf files" })

-- Map <leader>g to fzf-lua's live grep
keymap("n", "<leader>g", require("fzf-lua").live_grep, { desc = "Fzf live grep" })
Add the necessary plugins and configuration in init.lua:
...

-- Telescope
Plug('nvim-lua/plenary.nvim') --for fzf
Plug('nvim-telescope/telescope.nvim', { [ 'tag' ] = '0.1.4' })
Plug('ibhagwan/fzf-lua', {['branch'] = 'main'})


...
require"telescope_config"
Restart Neovim, skip the error by pressing Enter, and run :PlugInstall. After installation, restart again. Now, press the \ + f combination, and you’ll see the file search window:

Then, press the \ + g combination, and you’ll see the content search window:

Autosession
Autosession is a plugin that adds a familiar feature—it remembers which files were open before closing Neovim and automatically opens them the next time Neovim is launched.
Create the file autosession.lua:
require'auto-session'.setup {
  suppressed_dirs = { "~/", "~/Projects", "~/Downloads", "/"},
  auto_restore_last_session = true
}
Then, in init.lua, include the file and its configuration:
Plug('rmagatti/auto-session')
...
require"autosession"
Install, restart, and check:

Comment - code commenting
Now let’s add another basic feature—the ability to comment and uncomment code. For this, I use the Comment plugin. It works right out of the box and supports Treesitter, giving us compatibility with most programming languages.
Create the file comment_config.lua:
require('Comment').setup()Then, include the plugin and its configuration in init.lua:
...
Plug('numToStr/Comment.nvim')
...
require("comment_config")
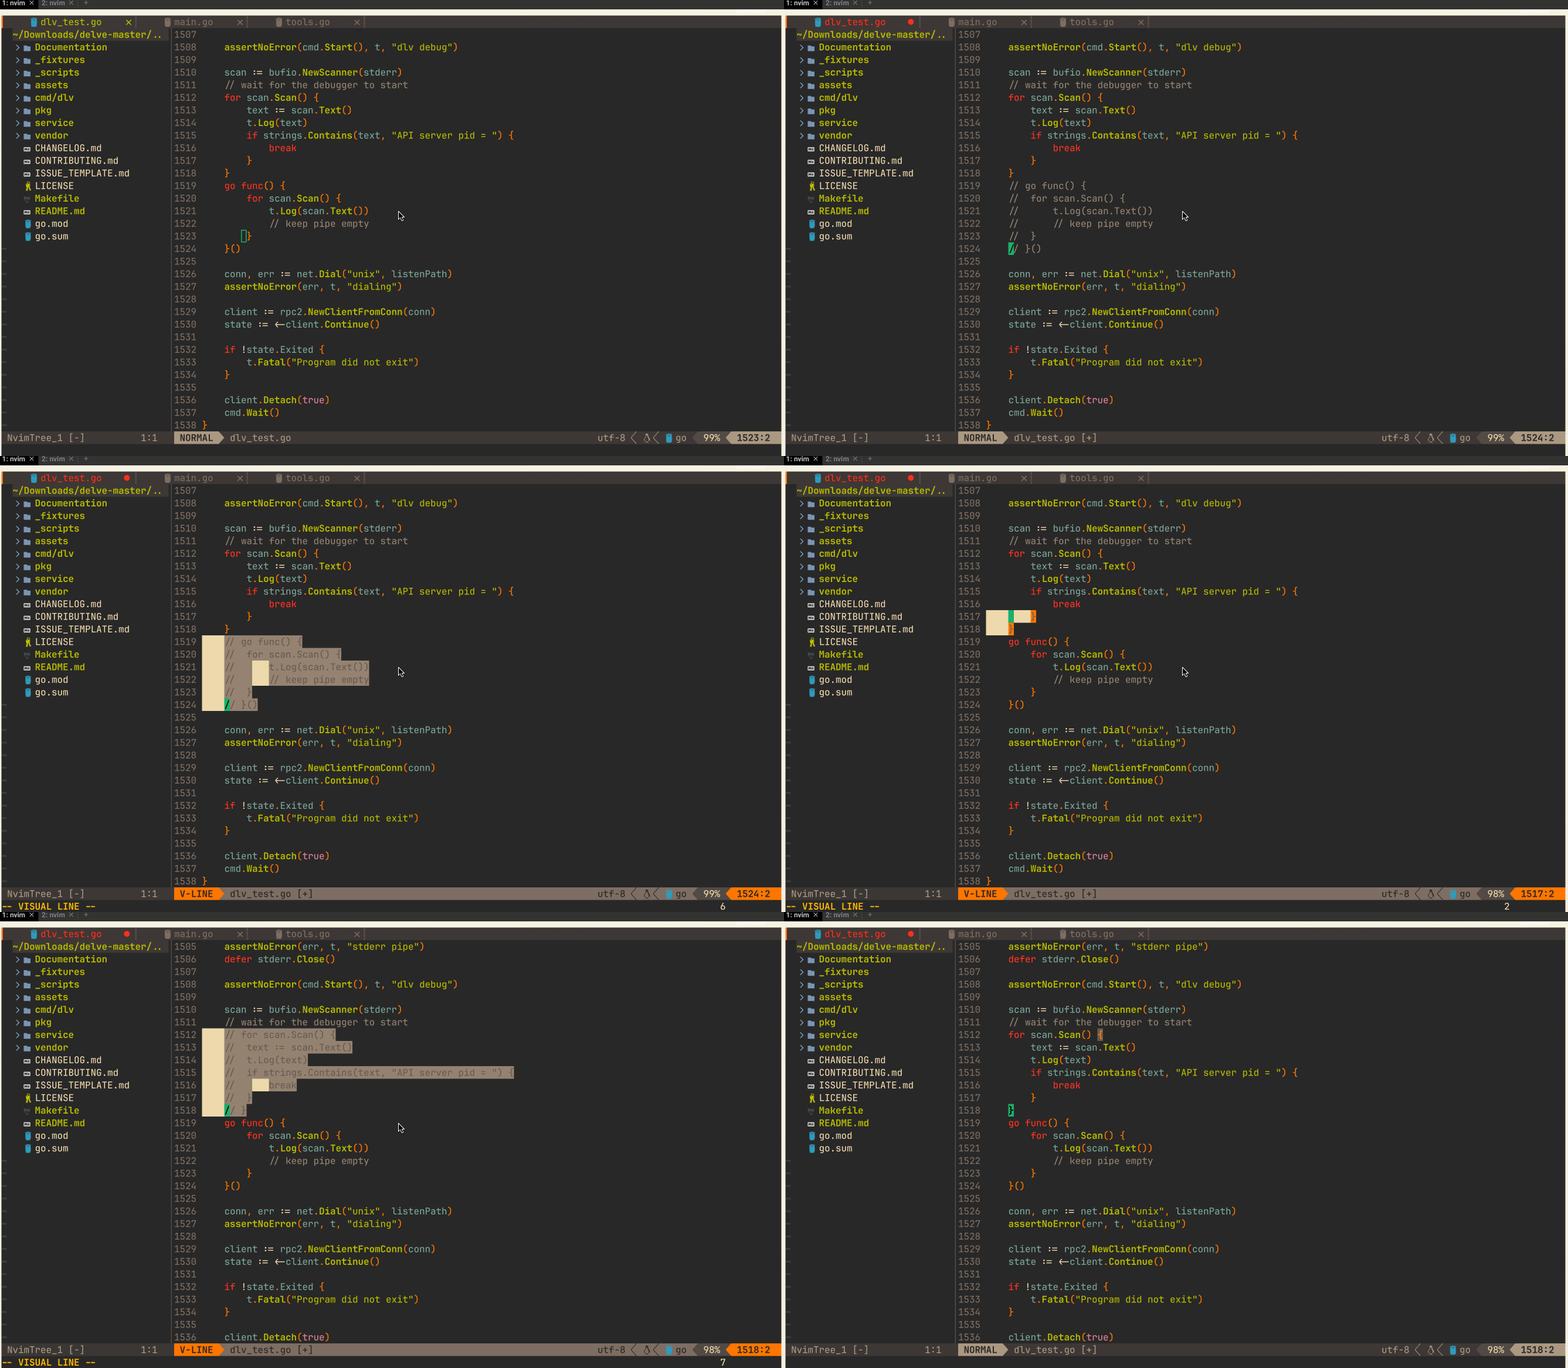
Install, restart, and then, by selecting any code section in visual mode (Shift + V + ↑/↓) and using the gc combination, you can comment and uncomment the selected code section:

Trouble
Neovim has its own built-in tools for displaying code errors, but accessing them is, to put it mildly, not straightforward.
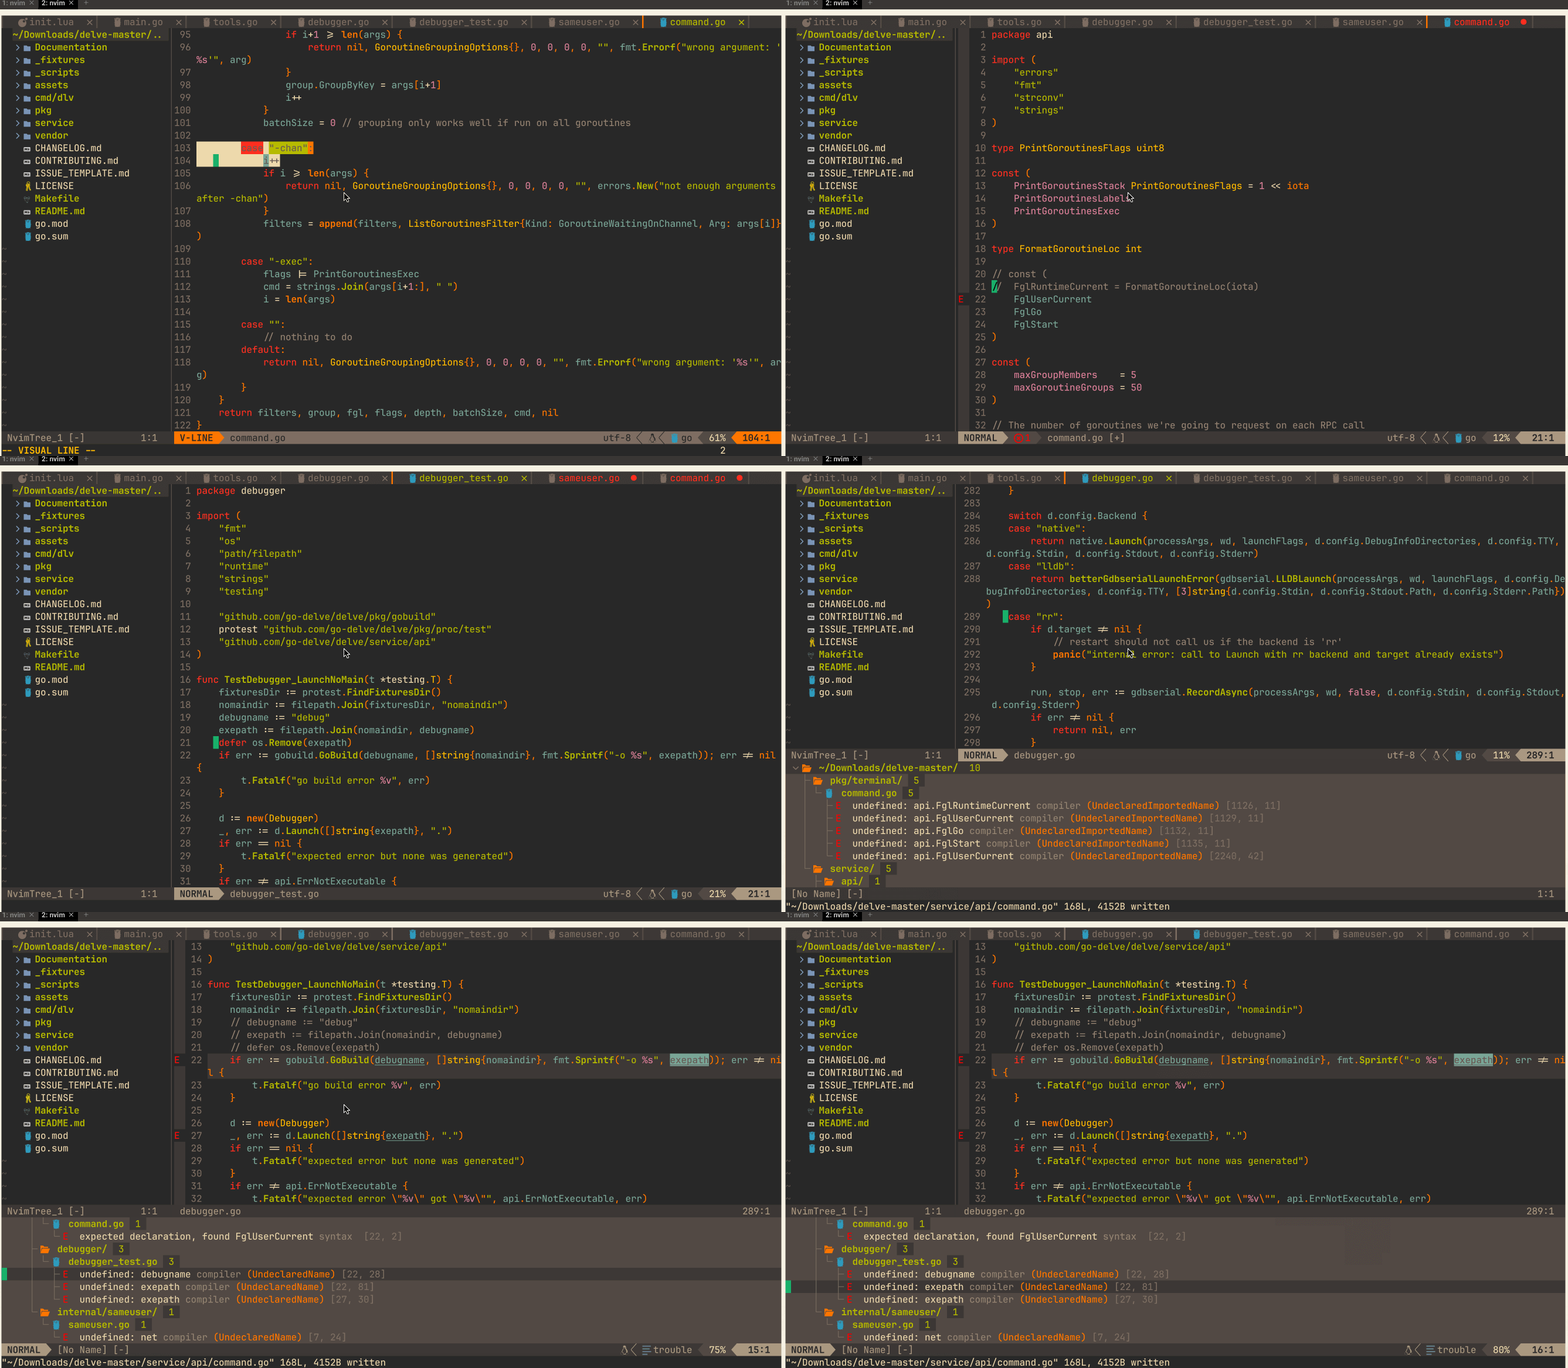
Trouble is a plugin that adds an interface for displaying all errors in the open project. Trouble supports the LSP server, allowing us to see all errors in a familiar format with clear comments.
Create the configuration file trouble_config.lua:
require('trouble').setup()

vim.keymap.set("n", "<leader>xx", function() require("trouble").toggle() end)
vim.keymap.set("n", "<leader>xw", function() require("trouble").toggle("workspace_diagnostics") end)
vim.keymap.set("n", "<leader>xd", function() require("trouble").toggle("document_diagnostics") end)
vim.keymap.set("n", "<leader>xq", function() require("trouble").toggle("quickfix") end)
vim.keymap.set("n", "<leader>xl", function() require("trouble").toggle("loclist") end)
vim.keymap.set("n", "gR", function() require("trouble").toggle("lsp_references") end)
init.lua:
...
Plug('folke/trouble.nvim')

...
require"trouble_config"
...
The plugin comes with a set of key combinations you can use out of the box, but I’ve remapped the interface opening to Command + [.
To do the same, go back to the WezTerm config and add another combination to open Trouble with Command.
wezterm.lua:
    -- Command + [: open trouble window
	['['] = utf8.char(0xA2),
    -- Command + ]: close trouble window
	[']'] = utf8.char(0xA3),

    ...

    bind_super_key_to_vim('['),
    bind_super_key_to_vim(']'),
    ...
Then, add these combinations in the Neovim config
combinations.lua:
...
-- cmd+[: get troubles
keymap("n", "<Char-0xA2>", "<cmd>Trouble diagnostics toggle<cr>", default_opts)
-- cmd+]: close troubles
keymap("n", "<Char-0xA3>", "<cmd>TroubleClose<cr>", default_opts)
...
Restart and check:

git-blame - interactive commit history
git-blame is a minimalist plugin that does the same thing we’re used to seeing in an IDE when we open annotations in the code: it displays the author and commit message.
The plugin requires no configuration, and to enable it, we just need to add the plugin in init.lua:
Plug 'f-person/git-blame.nvim'And install it. Then, hover over any line in a project with Git, and you’ll see:

Conclusion
With this, the basic configuration setup is complete. I’ve covered the most essential plugins that provide the fundamental features we’re used to in various IDEs.
My configuration is somewhat broader than what I showed above. For example, it includes plugins for working with tests, advanced Git handling, Git conflict resolution, more convenient search, and code debugging. However, to keep this concise, I’ll describe these plugins and their setup in separate articles.
You can find my full, constantly updated configuration here:
WezTerm configuration:
I also run the telegram channel (en) with a digest of materials on Go:
And a personal Telegram channel (ru), where I share various notes, tools, and my experiences:
Be sure to subscribe for new materials on this site as well; updates will be coming more frequently soon! 😄